This is a method I have developed for measuring eyes with Ninjabrain Bot by varying the in-game FOV slider instead of resizing the game window. Although it can achieve even better precision than the standard 16384-high window method, it comes with some RTA timeloss so I don’t expect it to become the new meta strategy. It is however a viable alternative for people who either prefer not to use tall window or can’t for some reason.
Unlike pixel counting, this angle adjustment method doesn’t currently have direct support in Ninjabrain Bot. This means some clever fudging of numbers is required to make it work. If there is interest from users and approval from the mods I could make a PR implementing this in ninbot once I find time to, which would make it simpler and slightly more precise.
This post assumes familiarity with how to perform standard boat eye.
1 - Setup
Firstly, make sure you know whether the window size and GUI scale combination you want to measure with has a misaligned crosshair. If you’re unsure, use this calculator. If yours has an offset, the method described here should still work but the correct lineup will look different from the examples shown. For example people on 1920x1080 should be unaffected by this, but with GUI scale 3 on 2560x1440 the crosshair is one pixel too far the right.
Then there are three settings you’ll want to configure differently from standard boat eye:
Crosshair correction
In the “Advanced” tab in Ninjabrain Bot settings, set “Crosshair correction” to the value of the calculation 31.187 / (your window height).
Note that the calc insists on rounding the value you type here to 4 decimal places, but the error resulting from this is just about small enough to ignore.
Angle adjustment
In the “Optional Features > Angle Adjustment” tab in Ninjabrain Bot settings, select “Custom adjustment” and set “Adjustment amount” to the value of the calculation 0.696666 / (your window height).
Standard deviation for boat eye
I don’t have enough data to give a definitive best value for σ (standard deviation). It depends on factors like your resolution and when in the eye’s travel time you measure it (later measurements are generally more accurate).
Based on simulation and testing with my own measurement habits I’m confident this method achieves lower than the 0.0007 value used for standard boat eye for users on 1080p and above. At the moment I suggest 0.00055 for 1080p and 0.0005 for 1440p.
Feel free to calibrate for yourself, as well as turn on the “Show angle errors” setting and learn what range of errors is typical for you. A safe σ value would be one for which an error greater than 2*σ without user error is a very rare event.
2 - Measuring
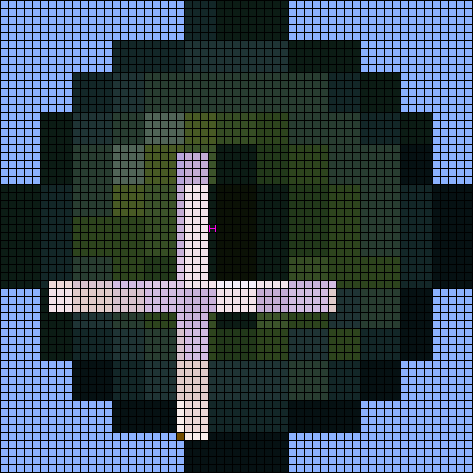
As usual start by getting green boat, throwing an eye, then dropping to 30fov. What’s different is that you will place your crosshair one screen pixel to the left of the normal lineup. Here’s what that looks like – note the one-pixel gap (marked in pink) between the right edge of the crosshair and the left edge of the middle eye pixel. A screen magnifier helps for this but is optional of course.
Since what we’re doing isn’t integrated into Ninjabrain Bot (yet) your vertical angle does matter. The values I’ve given are tuned to assume a pitch of -31.6 degrees but anything within half a degree is good enough. In practice this means you shouldn’t build up between throwing and measuring the eye, and if the eye’s vertical position looks close to my screenshot at any point in its motion you’ll be alright.
Once you have the lineup, press F3+C and pause your game. This should be a normal pause, not an F3+Esc pause, because we’re about to go into the options menu…
3 - Adjustment
In the options menu, turn your FOV up until the one-pixel gap you created disappears. You need to find the lowest FOV at which this happens – this will be somewhere between 31 and 79. If at this point you can’t see your crosshair because you’re on 1080p with GUI Scale 2 and the “Done” button is in the way, I’m sorry. The only fix I have for that at the moment is to change your GUI scale.
The relation between this FOV value and the number of adjustments you’ll need to send to the calculator isn’t quite linear, but fortunately it doesn’t need much memorization to calculate:
| FOV range | Adjustments |
|---|---|
| FOV ≤ 60 | FOV - 50 |
| 61 ≤ FOV ≤ 66 | FOV - 50 + 1 |
| 67 ≤ FOV ≤ 71 | FOV - 50 + 2 |
| 72 ≤ FOV ≤ 74 | FOV - 50 + 3 |
| 75 ≤ FOV | FOV - 50 + 4 |
For example, from 38 FOV you would do a -12 adjustment, 67 would be +19, and 77 would be +31. That is admittedly a lot of times to press the adjustment key – I’d recommend setting a low key repeat delay so you can hold the button down to do this faster.
Video example
Here’s an clip of me performing this method at 1440p, with a magnifier and brightness filter to better show what’s going on under the pause screen:
Enjoy Eye-Spying! Thanks to:
- ExeRSolver for all his past research into Eye of Ender mechanics.
- @chloe for helping test the method.