I’ve had the idea to make such a spreadsheet ever since I started zero cycling and had done most of the data gathering months ago. While lurking in his stream r0hkx mentioned the idea of something similar a few days ago and I though it would be kind of a waste not to finish it.
All the testing done on this sheet are done on the Mescht Zero Cycle Practice Map v1.2.1 .
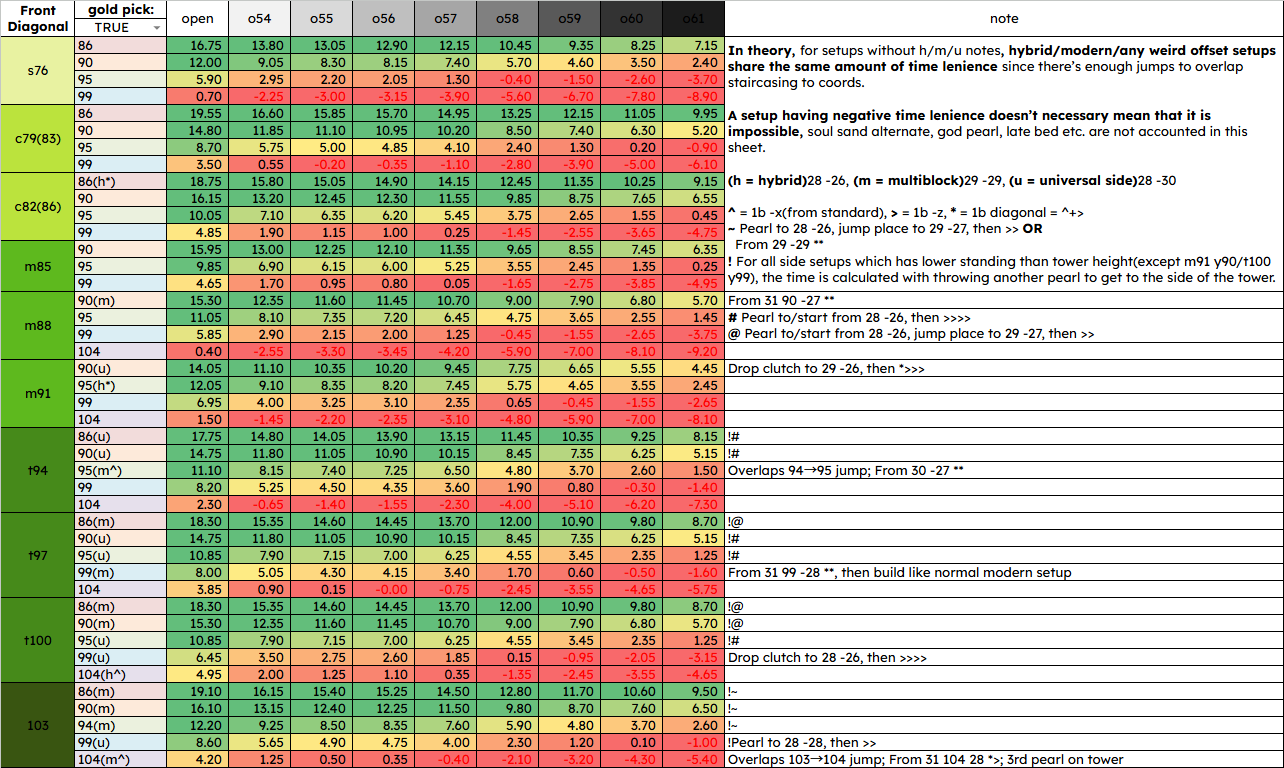
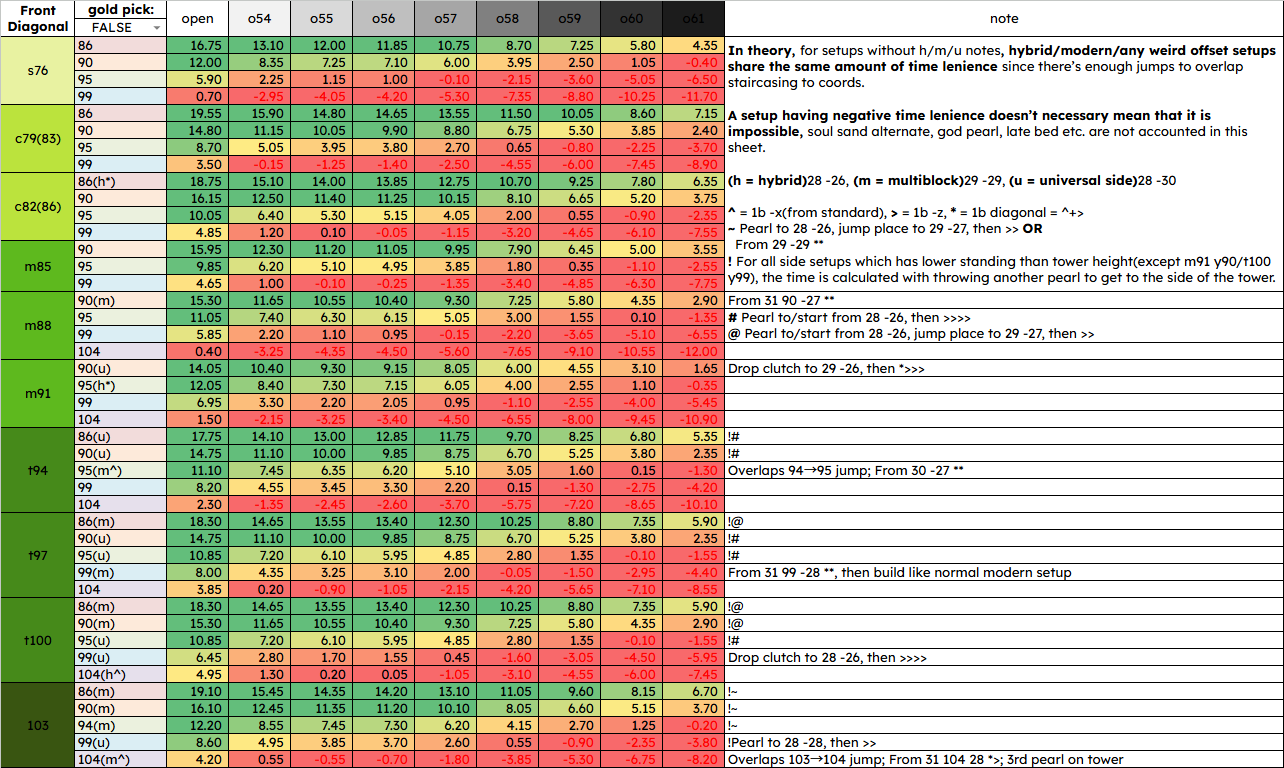
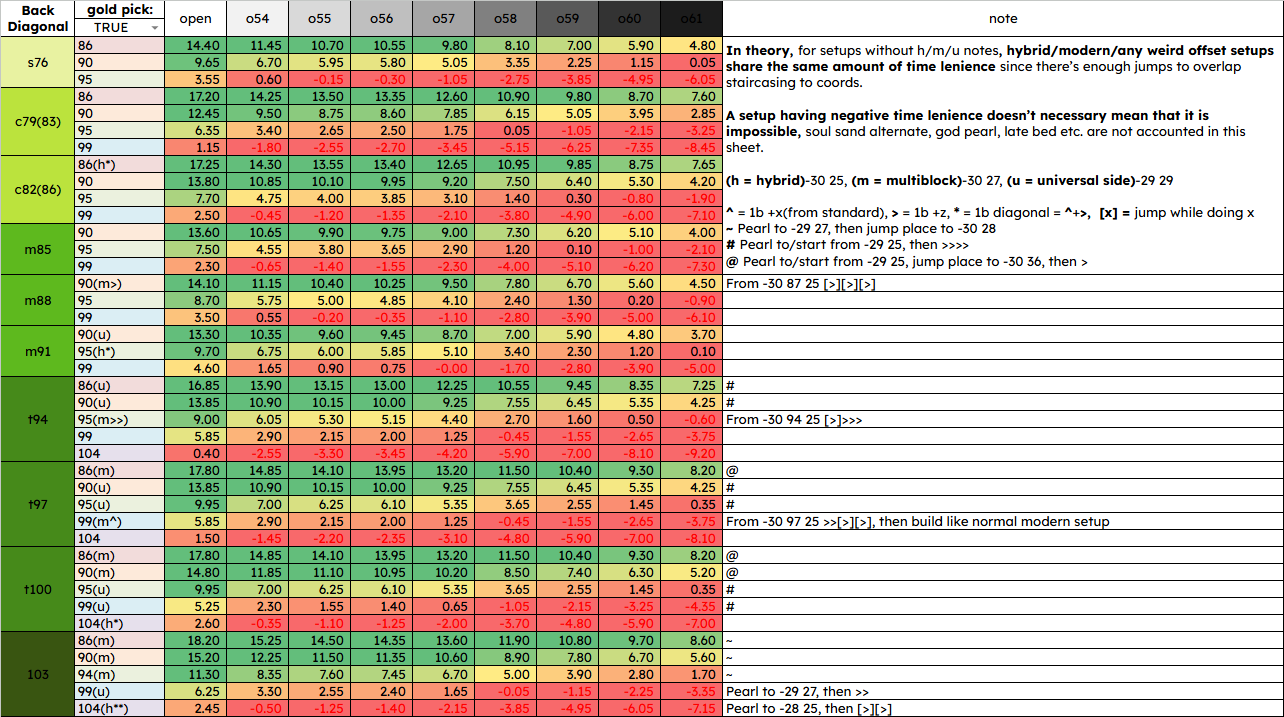
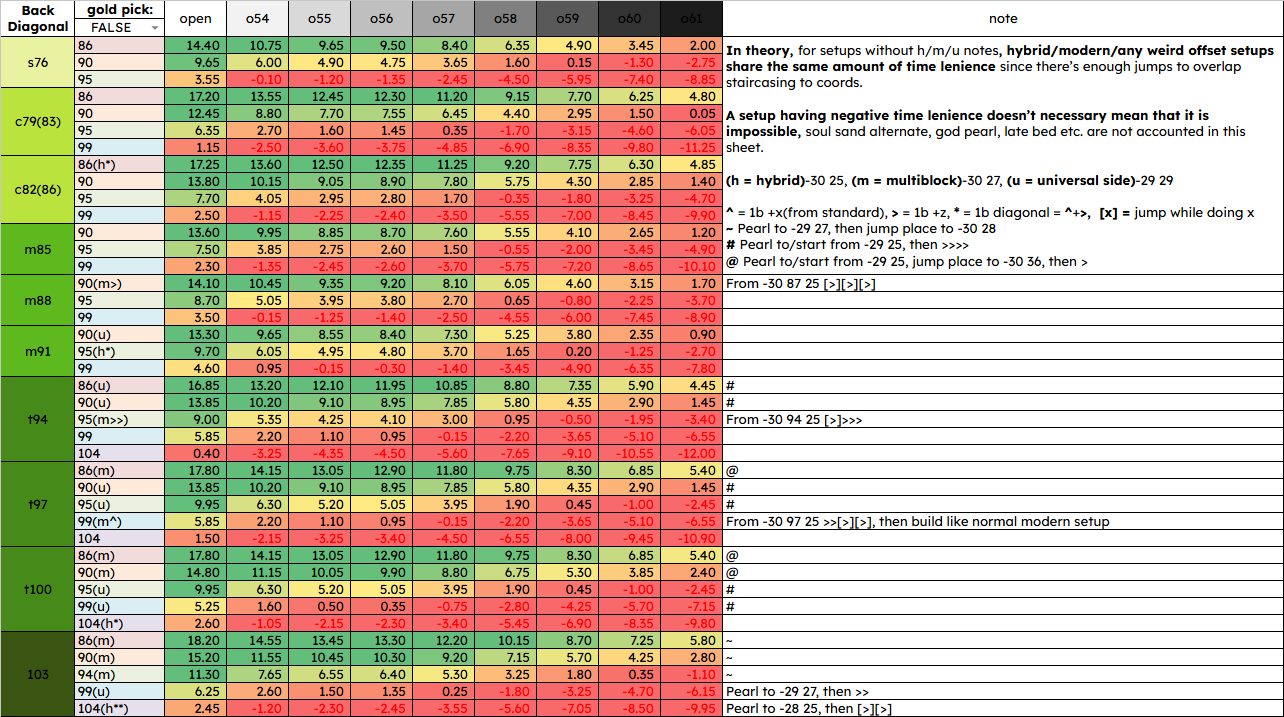
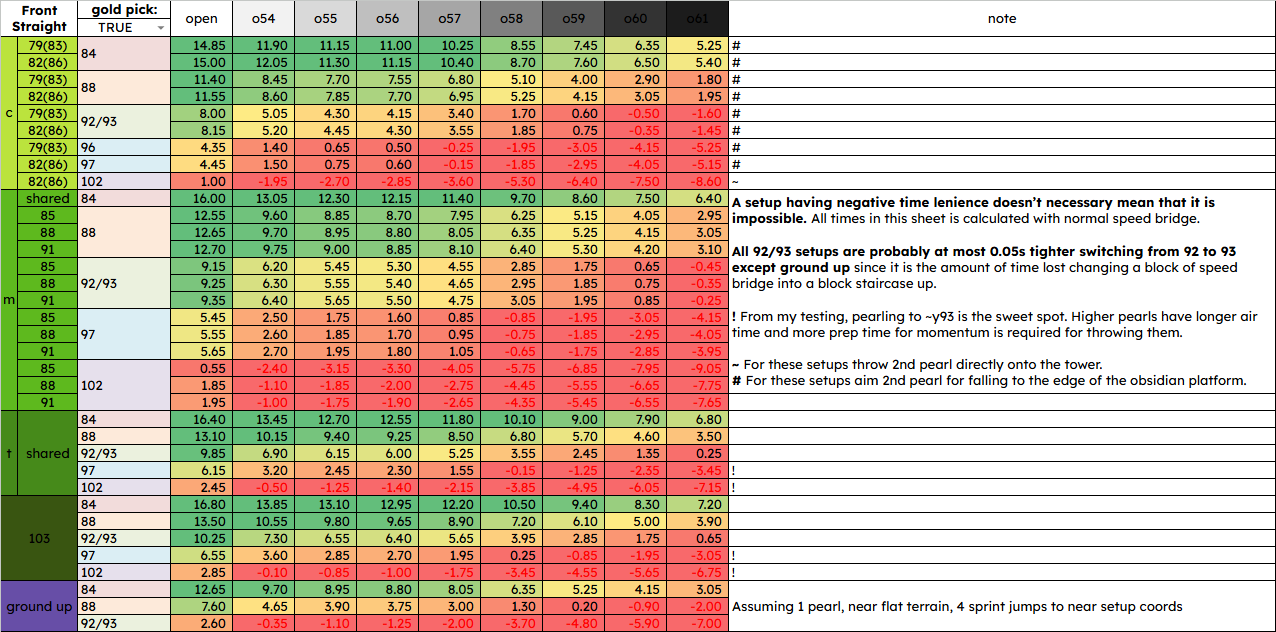
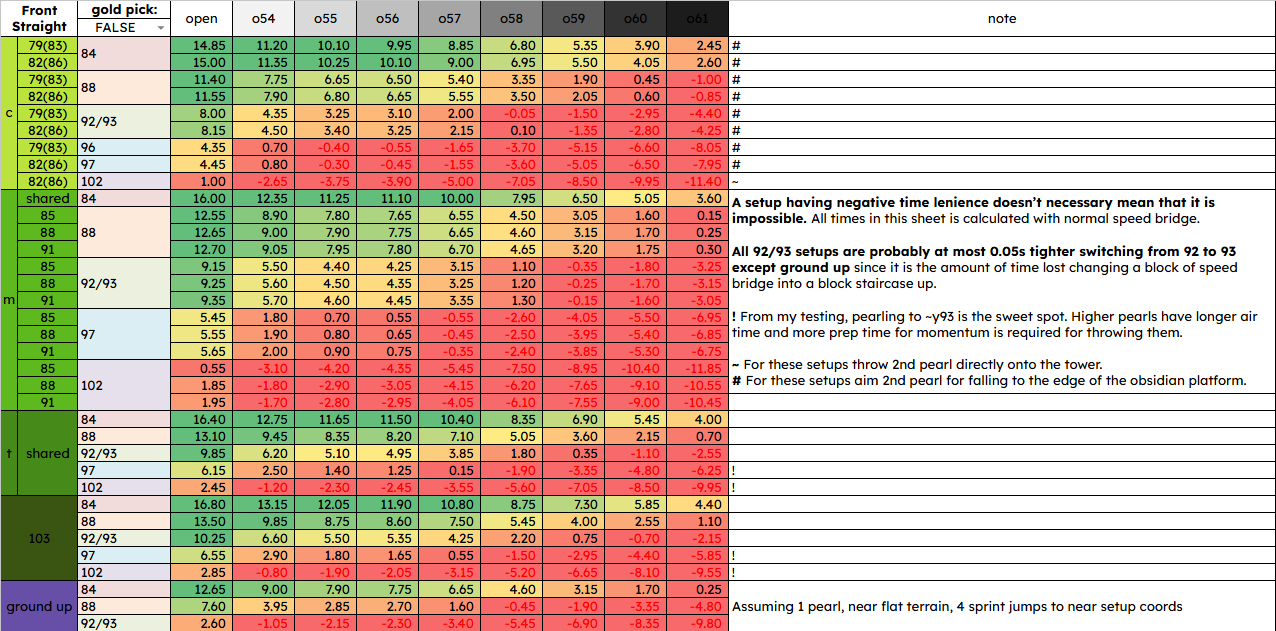
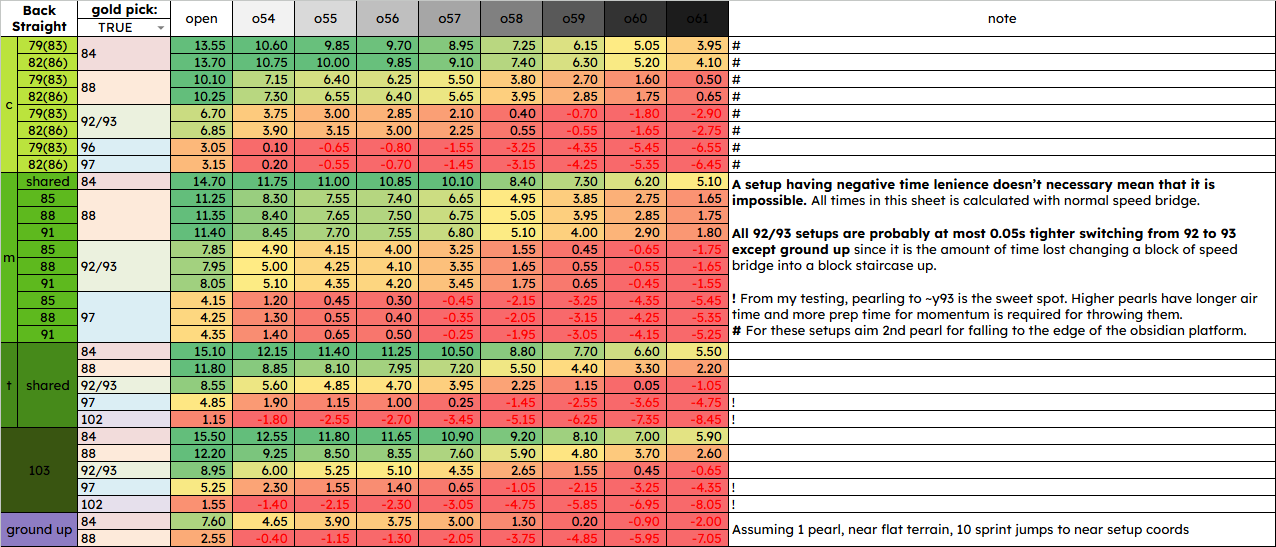
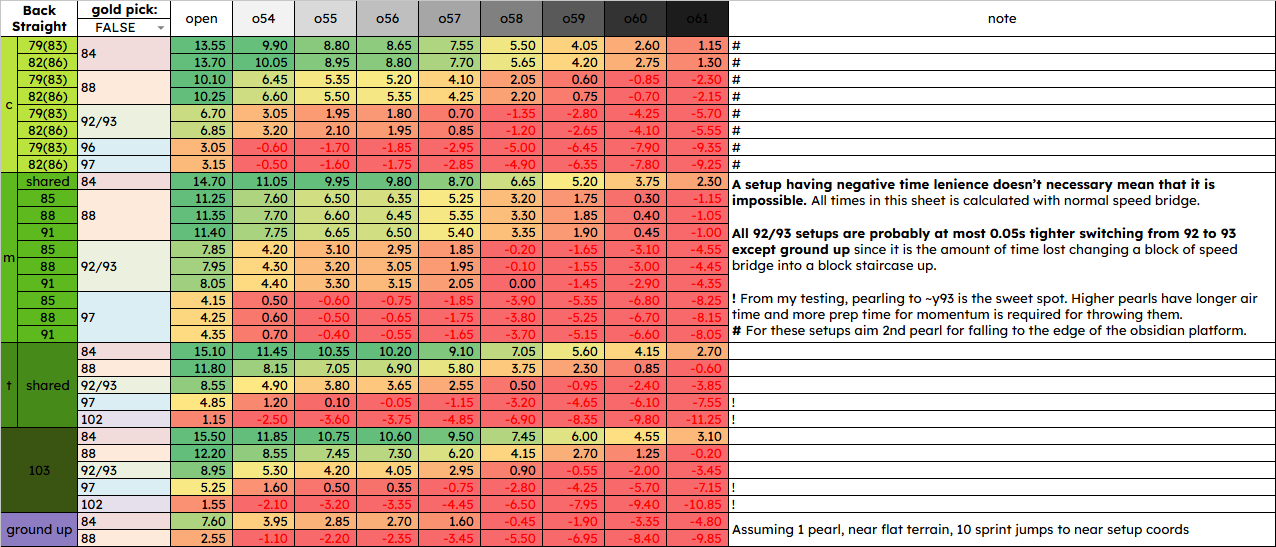
All the times listed in the sheet follows the principle of being consistently repreducable, so it is way closer to a top runner doing zero cycles in a real ranked run than TAS throwing every pearl perfectly saving 0.5 second on every single split. In my opinion this makes the sheet more referencable for how possible/whether to go for or not in real run conditions. This results in several setups despite being listed as having negative time allowance are actually very hittable, for example, I myself had hit open front m85 y103, which will be -0.35s if it is on the sheet.
The sheet features all zero cycle setups that I do, so it only shows one setup for each tower-y height combination. Notes contains the information for weird setups that the way the setup is built being used in the time calculation.
For end spawns, open spawn and all standard cage spawns from o54 to o61 are listed. o54/o55 are single pearl clip; o56 and above are double pearl clip. Overhang spawns aren’t listed for obvious reasons; I have no good way to properly estimate the time loss for o52/o53 so they aren’t listed either. Time losses for o59~o61 compared to o58 are estimated from that the end stone taking 0.4s to mine + 0.25s cooldown + 0.45s jump = 1.1s per block. The total time lost for an end spawn is determined by the time that the first pearl moving towards the obsidian pillars land, with an additional 0.4s compensation for player getting out of damage tick animation and aim the next pearl. (The pearl always goes to the right side, regardless of it is a front or back dragon.) I have tried my best to go as fast as possible and selecting the fastest reasonable time for this part but it is likely that more time can be consistently saved from the time I listed.
For pearling onto the tower, all pearls are set to land exactly 1 block below the height of the tower, which means an extra jump is needed to jump up the tower after block clutching. The time listed for this pearl is always from pearl throw to standing on top of the tower, which I just recorded several videos of me throwing such pearl and selecting the fastest one, so it is likely also not very precise. Pearling to the side of the tower however doesn’t get affected by this since there is a lot more room for where the pearl could land.
For building to setup coords, every block stacked up is 0.45s, every block bridged is 0.40s and every diagonal bridge is 0.50s, with every staircase towards coords considered fully overlapped by stacking up. I think soul sand alternating is not worth having a separate sheet for, but it is still a measureable time save on a few setups.
For setup times, a normal setup(not sure what it is called) is 2.05s from start to bed placed, and a multiblock setup is 2.50s.
For the latest possible bed placement for each setup, I just eyeballed on the faster dragon rotation on the height’s hybrid setup when to place the bed can still do an acceptable damage while dealing acceptable knockback to the dragon.
Doing this on every offset setup takes way too much time so I just assumed that for each diagonal out the setup is from the hybrid setup, the dragon is roughly 0.1~0.2s faster to reach the setup. This is definitely very sloppy and has possibly resulted in a ±0.3s error in every setup, but I really don’t have a better way of doing it and I will be glad if someone with the correct tools can fill in more precise data for this.
25/10/19 Edit 1&2: Fixed wrong coords and setup for back diagonal m88 y90.
25/10/19 Edit 3: Fixed wrong coords and setup for front diagonal m88 y90 & spelling mistake.
25/12/16 Edit: Fixed incorrect block count for mining out o61, which resulted in iron pick o61 times being 0.35s looser than it actually is.
26/03/05 Edit: Removed s76 in 1/8 because it apperantely doesn’t exist. Also that means every zero tower has a different probability of getting chosen when it comes to 1/8 so I will have to redo the entire section in Blaze Bed or Zero Cycle again but I want to do stronghold related stuff today so that will be delayed.
links to some good videos because apparentely people are learning zero cycles with this:
-
tutorial videos:
- T_Wagz’s original zero cycle tutorial, all the setups are outdated but has extra information you can’t find elsewhere, highly recommended to watch first:
A Complete Speedrunners Guide to the Fast Zero Cycle - Dibedy & doogile’s zero cycle tutorial: How to ZERO CYCLE - ft. @Doogile
- T_Wagz’s original zero cycle tutorial, all the setups are outdated but has extra information you can’t find elsewhere, highly recommended to watch first:
-
bonus setup videos:
- kohout135’s setup collection video: All Useful Zero Cycle Setups (2026)
- pion’s 5 explosives zero setup collection video: A Guide to Every Zero Cycle Setup in 5 Explosives
- hasbi’s multiblock setups showcase video: NEW zero setups for almost every tower (compilation)